357th FG Profile
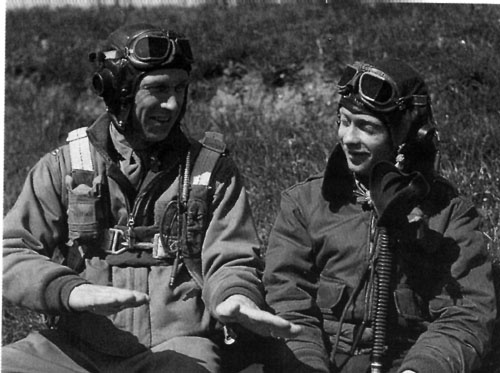
Capt Glendon Davis discusses maneuvers with “Little Red” Harris, 364th FS, 7 1/2 Victories

Spring 1944
Modeler Tips:
Tail Number Error in these decals. Tail Number should be 43-6867 or 36867
Side View Notes:
A. Rear red band on propeller boss extends onto spinner to leading edge of
blades when in neutral pitch. Determine width of yellow band by dividing
remainder of spinner evenly.
B. Mission marks- 5 bombs in first group, 4 each in remaining two groups. Note 2 diagonal brooms, denoting offensive fighter sweeps above first two bombs in first group. 2 smaller diagonal bombs appear at end of second group.
C. “Pregnant Polecat” in yellow, note position relative to lower strip panel & firewall.
D. Kill marks. Eight white swastikas. 5 in top row, 3 in bottom row. Note that the two swastikas forming the second column sit slightly higher than the others.
E. There were no antenna wires installed on 357th Mustangs.
F. Tail number in yellow, “36” on fin, “878” on rudder.
G. White recognition stripes were of standard widths on wings and horizontal stabilizers.
Upper & Lower View Notes:
G. Repeat of item “G” from Side View Notes. H, I, J. Red, Green, Yellow navigation lights- circular and flush with wing panel.
K. Formation Lights- Red (Port) and Green (Starboard)
Overall Modeling Tips:
*This aircraft wore dark olive green over USAAC medium gray. There were no antenna wires installed on this aircraft.
*Precious few decals have ever been produced for this aircraft, they are included on ProModeler #5931. If you want to try from scratch there are a couple of different ways to do it. If you’re like me and only use freehand as a last resort, you may want to try making masks for the letters. Using a copier machine to adjust for size, reproduce a printout of the letters provided in the diagram, separate them and use a thin layer of white glue
to paste them to a fine rag piece of paper. Roll out the excess glue with a dowel. Cut the letters out with a very sharp hobby knife. After you are satisfied with the stencils you’ve made, apply a tiny amount of rubber cement
to their backs and lay them in along the panel seam (don’t forget to tilt’m!) Mask off the surrounding area and airbrush in the white letters, let dry, pull stencils away, remove any excess rubber cement film and Presto!
*Prior to assembly, wash clear plastic parts with a mild glass cleaner and gently wipe dry. Then use a Q-Tip to evenly spread clear liquid floor wax (Future Brand seems to get the best results) on both inside & outside.
Protect from dust and let dry for at least 2 hours. The wax fills in microscopic flaws and creates an even gloss that is clearer & shines brighter than the original plastic underneath.
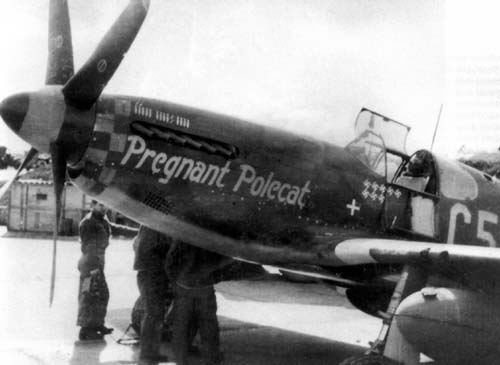
Capt. Glendon V. Davis’ P-51B Mustang “Pregnant Polecat”
ProModeler Decal Sheet 88100300200 and SuperScale Decal Sheet SS48-691