357th FG Profile

Capt. Hershel “Tom” Pascoe and Crew Chiefs Roger Bender and Jim Loersch
 Autumn /-Fall 1944
Modeler Tips:
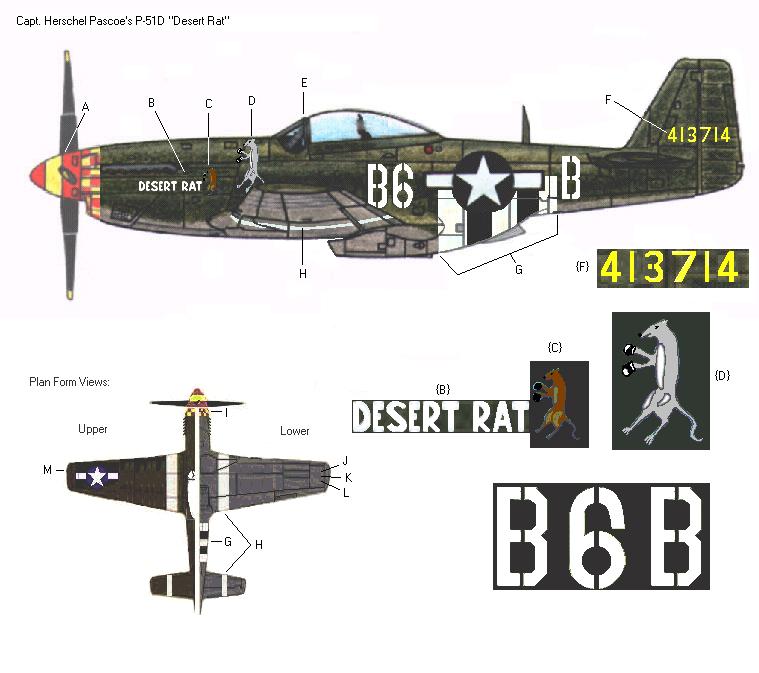
Side View Notes:
A. Rear red band on propeller boss extends onto spinner to leading edge
of blades when in neutral pitch. Determine width of yellow band by dividing
remainder of spinner evenly.
B. “Desert Rat” rests within lower strip panel, height is about 3/4
of the panel width. On Page 92 of Merle Olmstead’s book “The 367th Over
Europe”, there is a photo of this aircraft which shows the lettering to advantage.
C. Small brown rat standing upright wearing boxing gloves.
D. Large gray rat standing upright wearing boxing gloves.
E. No mirror.
F. Tail Number in yellow. Early-type tail with no dorsal fin extension.
G. Full width invasion stripes, cut down to half height.
H. White recognition stripes were of standard widths on wings &
stabilizers for mid-1944 ETO Mustangs.
Upper & Lower View Notes:
G & H. Repeats of items listed above.
I. Width of checkers reduced on underside in order to fit evenly on the
narrow surfaces of the chin scoop area.
J, K, L. Red, Green, Yellow navigation lights- circular and flush with
wing panel.
M. Formation Lights- Red (Port) and Green (Starboard)
Overall Modeling Tips:
*This aircraft wore dark olive green over USAAC medium gray.
*After building several 357th A/C over the past 30 years, I recommend
painting the nose area forward of the exhaust cutout yellow when the flat
features are painted. When the time for decals arrives, carefully cut
away the yellow squares from the checkerboard decal and apply the remaining strip
of red checkers to the nose. This method significantly reduces the potential for bubbles, and wrinkles plus
it makes exact alignment of the decal easier.
*Prior to assembly, wash clear plastic parts with a mild glass cleaner
and gently wipe dry. Then use a Q-Tip to evenly spread clear liquid floor
wax (Future Brand seems to get the best results) on both inside & outside.
Protect from dust and let dry for at least 2 hours. The wax fills in
microscopic flaws and creates an even gloss that is clearer & shines
brighter than the original plastic underneath.

Capt. Herschel T. Pascoe’s P-51D Mustang “Desert Rat”
Repli-Scale Decal Sheet 48-5059